Friday, July 19, 2013

Android Device Management API: Bluetooth

Based on the android sample of BluetoothChat, I summarize a simple framework and essential APIs to detect/connect/open/close/ Bluetooth, setup as a server/client, send/receive message.

summary: 

2 class, BluetoothChat.java, the main activity; BluetoothChatService.java, 3 threads. The bluetoothChat.java find the local bluetooth adapter, turn it on. It will instantiate a BluetoothChatService and start the AccetpThread as a server side. This thread calls a blocking fuction who will return a successful bluetooth socket and start the ConnectedThread for treating the incoming and outgoing message. If searching remote bluetooth is launched and one of them has been chosen to connect, the local bluetooth is client side, the ConnectThread starts and call a blocking function for a successful connection. Then the ConnectedThread will be launch,too, like the server side.

1. Get local bluetooth adapter  --  onCreate()

private BluetoothAdapter mBluetoothAdapter = null;
mBluetoothAdapter = BluetoothAdapter.getDefaultAdapter();

//The BluetoothAdapter lets you perform fundamental Bluetooth tasks. Represents the local device //Bluetooth adapter.

2. Turn on Bluetooth  --  onStart() 

if(!mBluetoothAdapter.isEnabled()){
    Intent enableIntent = new Intent(BluetoothAdapter.ACTION_REQUEST_ENABLE);
    startActivityForResult(enableIntent, REQUEST_ENABLE_BT);
}
// isEnabled: returns true if Bluetooth is currently enabled and ready for use
//ACTION_REQUEST_ENABLE: a system activity that allows the user to turn on Bluetooth
// An activity to ask the user whether turn on the bluetooth or not will be launched, and when it exited,
//call onActivityResult()

3. onResume()  --  onPause()

4. onActivityResult() // called when the activity to start bluetooth is finished

switch (requestCode) {
    case REQUEST_ENABLE_BT:
                setupChat();
            }

5. setupChat()  // instancier BluetoothChatService() and resume the main activity

mChatService = new BluetoothChatService(this, mHandler);

6. onResume()  // start the chat service as a server

if (mChatService != null) {
            if (mChatService.getState() == BluetoothChatService.STATE_NONE) {
              mChatService.start();
            }
}

7. BluetoothChatService.start()  --  AcceptThread.start()  --  

                                  --  BluetoothChatService.connected()  --  ConnectedThread.start()

//the thread AcceptThread wait for a connection, accept it, create a new server socket and
//start the thread ConnectedThread to handle all incoming and outgoing transmissions

public synchronized void start() 
// synchronized function: block other synchronized functions before it finishes
 if (mAcceptThread == null) {
            mAcceptThread = new AcceptThread();
            mAcceptThread.start();

private class AcceptThread extends Thread {
    public void run() {
        BluetoothSocket socket = null;
        socket = mmServerSocket.accept();
        connected(socket, socket.getRemoteDevice(), mSocketType);

private class ConnectThread extends Thread {
    public void run() {
        while (true) {
            bytes = mmInStream.read(buffer);    //read incoming message and send to Handle
                mHandler.obtainMessage(BluetoothChat.MESSAGE_READ, bytes, -1, buffer)
                            .sendToTarget();
         }
    }
}
BluetoothChat.mHandler(){
    switch (msg.what) {
        case MESSAGE_READ:
}

8. onOptionsItemSelected()  //start the char service as a client

switch (item.getItemId()) {
    case R.id.secure_connect_scan:
        serverIntent = new Intent(this, DeviceListActivity.class);
        startActivityForResult(serverIntent, REQUEST_CONNECT_DEVICE_SECURE);
        return true;
}

onActivityResult(){ // called when the activity to start bluetooth is finished
    switch (requestCode) {
        case REQUEST_CONNECT_DEVICE_SECURE:
                connectDevice(data, true);
            break;
    }
connectDevice(){
    String address = data.getExtras()
            .getString(DeviceListActivity.EXTRA_DEVICE_ADDRESS);
        BluetoothDevice device = mBluetoothAdapter.getRemoteDevice(address);
        mChatService.connect(device, secure);
}

9. BluetoothChatService.connect()  --  ConnectThread.start()  --

                                  --  BluetoothChatService.connected()  --  ConnectedThread.start()

public synchronized void connect(){
    mConnectThread = new ConnectThread(device, secure);
    mConnectThread.start();
    setState(STATE_CONNECTING);
}
private class ConnectThread extends Thread {
     public void run() {
        mmSocket.connect();  // a blocking call returning either a successful connection or an exception
        connected(mmSocket, mmDevice, mSocketType);
    }
}
//the part of the connected thread is same as server at point 7.

10. Send message

setupChat(){
mSendButton = (Button) findViewById(R.id.button_send);
mSendButton.setOnClickListener(new OnClickListener() {
    public void onClick(View v) {
        sendMessage(message);
        }
    });
}
sendMessage(){
if (mChatService.getState() != BluetoothChatService.STATE_CONNECTED) {
//Check that we're actually connected before trying anything
            }
if (message.length() > 0) {
//Check that there's actually something to send
            }

11. Make bluetooth discoverable

onOptionsItemSelected() {
        switch (item.getItemId()) {
        case R.id.scan:
            // Launch the DeviceListActivity to see devices and do scan
            Intent serverIntent = new Intent(this, DeviceListActivity.class);
            startActivityForResult(serverIntent, REQUEST_CONNECT_DEVICE);
            return true;
        case R.id.discoverable:
            // Ensure this device is discoverable by others
            ensureDiscoverable();
            return true;
        }
        return false;
    }

ensureDiscoverable() {
        if (mBluetoothAdapter.getScanMode() !=
                    BluetoothAdapter.SCAN_MODE_CONNECTABLE_DISCOVERABLE) {
            Intent discoverableIntent = new                           Intent(BluetoothAdapter.ACTION_REQUEST_DISCOVERABLE);
            discoverableIntent.putExtra(BluetoothAdapter.EXTRA_DISCOVERABLE_DURATION, 300);
            startActivity(discoverableIntent);
        }

key word: 

synchronized function:
When one thread is executing a synchronized method for an object, all other threads that invoke synchronized methods for the same object block (suspend execution) until the first thread is done with the object.
Wednesday, July 17, 2013

Internet API Sockets on Linux in C

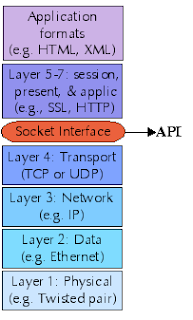
The sockets interface provides a uniform API to the lower layers of a network, and allows to implement upper layers within the sockets application.

An IPv4 address is a 32-bit data value, usually represented in "dotted quad" notion, e.g., 192.168.1.25. A port is 16-bit data value. An IP address gets a packet to a machine, a port lets the machine decide which process/service to direct it to.

Protocol TCP: Transmission Control Protocol.

Protocol IP : principal communication protocol in the internet protocol suite.

Add caption


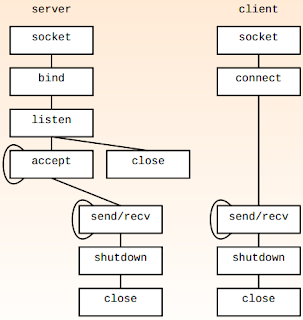
socket server:

#include <sys/socket.h>
#include <netinet/in.h>

char buffer[256];
int client, newsockfd, n;

/*
Initialize the socket structure:
*/
struct sockaddr_in serv_addr, cli_addr;
serv_addr.sin_family = AF_INET;                    // protocol IP
serv_addr.sin_addr.s_addr = INADDR_ANY; // run without knowing the machine address running on
serv_addr.sin_port = htons(5000);                     //  convert the port number to TCP/IP network byte 

/*
create a socket, it is also a file descriptor to read/write later.
Domain : AF_INET, for network protocol IPv4
Type      : SOCK_STREAM, for network protocol TCP
Protocol : Service provider chooses the protocol to use
*/
int listenfd = socket(AF_INET, SOCK_STREAM, 0);

/*
assign a socket to an address.
*/
bind(listenfd, (struct sockaddr*)&serv_addr, sizeof(serv_addr));

/*
prepare the socket for incoming connections, the second parameter is the most number of connection
*/
listen(listenfd, 10);

/*
accept actual connection from the client
*/
client = sizeof(cli_addr);
newsockfd = accept(listenfd,  (struct sockaddr *) &cli_addr, &client);

/*start to communicate*/
n = read(newsockfd, buffer, 255);
printf("A new message: %s\n", buffer);


socket client:

char addr_ip[] = "192.168.0.45"; // server machine address
SOCKET sock;
SOCKADDR_IN adr;

adr.sin_addr.s_addr = inet_addr(addr_ip); //convert the a string to a proper address  
adr.sin_family = AF_INET;
adr.sin_port = htons(5000); // same port number as the server

/*create the socket*/
sock = socket(AF_INET, SOCK_STREAM, 0); 

/*demand a connection*/
connect(sock, (SOCKADDR*)&adr, sizeof(adr));

/*send a message*/
unsigned char hello[] = "Hello, server!\r\n";
send(sock, (constchar *)hello, strlen(constchar *)hello);

/*close socket*/
close(socket);


Sunday, July 14, 2013

Configuration of VIM, GIT

VIM:
        sudo vim /etc/vim/vimrc
        set nu (line number)
        syntax on (highlight syntax)

GIT:
1.     /home/.gitconfig
        [alias]
        co  = checkout
    ci  = commit
    st  = status
    br  = branch
    gss =  
    hist = log --pretty=format:'%h %ad | %s%d [%an]' --graph --date=short

2.  /home/.bashrc
    alias gss='git status '
    alias ga='git add '
    alias gb='git branch '
    alias gi='git commit -a '
    alias gd='git diff '
    alias go='git checkout '
    alias gt='git tag '

Detect smart phone for Eclipse under Ubuntu

Although the emulator, it's better to test the Android application in the phone, here is the method to connect android smart phone with the computer and be recognized by eclipse.

$ lsusb
For SONY XPERIA, a line of information like this will show up:
Bus 003 Device 003: ID 0fce:e17c Sony Ericsson Mobile Communications AB

$sudo gedit /etc/udev/rules.d/51-android.rules:
SUBSYSTEM=="usb", ATTRS{idVendor}=="0fce", ATTRS{idProduct}=="5156", MODE="0666"

$sudo restart udev: restart device manager

$adb kill-server
$adb start-server :   restart android service

$adb devices:  show the device list

sometimes, after the configuration, the phone is still not recognized. Try to restart Eclipse, disconnect and reconnect the usb, that would be helpful.

Powerful Git Command

1. return back to the last commit:
    git checkout -f

2. return back to any commit:
    "git hist" to show all the commit
    "git checkout 7-letter code" to change the HEAD
    do not change the branch before create a new branch, if not, the work will be lost.

3. create a new branch and switch over, delete
     "git checkout -b name_new_branch "

4. start up and set up personnel information
    git init
    git config --global user.name "your name"
    git config --global user.email "your_email@whatever.com"

5. restore the modification not yet staging
    git checkout "file"

6. restore the modification staging but not yet committing
    git reset HEAD^

7. squashing commits
    git rebase -i HEAD~num_of_commit_to_squash

8. patch
    make a patch between the current branch and the master: git diff master > file.patch
    after switching to the master, apply the patch: git apply file.patch
    git apply -check for verifying the availability of the patch
9. modify the latest commit
    git commit -amend -m "new commit message"

Linux Driver MPR121

3 tasks to achieve:

1. Configure MPR121: initialize registers, configure buttons, leds, gpio, calculate parameters, etc
2. Create a thread and handler for IRQ
3. Create these sysFs for a dynamic configuration

Prepare data and allocate memory

static int __devinit mpr_touchkey_probe(struct i2c_client *client, const struct i2c_device_id *id){
const struct mpr121_platform_data *pdata=client->dev.platform_data;
The client represent the device mpr121, the platform_data is predefined at board file.

struct mpr121_touchkey *mpr121;
struct input_dev *input_dev;
input_dev represent a device who produces the signal of input to the module ARM.

mpr121 = kzalloc(sizeof(struct mpr121_touchkey), GFP_KERNEL);
input_dev = input_allocate_device();
input_allocate_device() allocate memory for a new device and return a structure of input_dev.

mpr121->client = client;
mpr121->input_dev = input_dev;
mpr121->keycount = pdata->keymap;

input_dev->name = "mpr121";//name of the device
input_dev->id.bustype = BUS_I2C;//id of the device (struct input_id)
input_dev->dev.parent = &client->dev;//driver model's view of this device
input_dev->evbit[0] = BIT_MASK(EV_KEY) | BIT_MASK(EV_REP);
//bitmap of types of events supported by the device (EV_KEY, EV_REL, etc.)
/* EV_KEY:- Used to describe state changes of keyboards, buttons, or other key-like devices.*/
/* EV_REP:- Used for autorepeating devices.*/   
input_dev->keycode = mpr121->keycodes; //map of scancodes to keycodes for this device
input_dev->keycodesize = sizeof(mpr121->keycodes[0]);
input_dev->keycodemax = mpr121->keycount;//size of keycode table
input_dev->name is an important parameter which must be also the name of the keylayout file(mpr121.kl) and input device configure file(mpr121.idc).

for (i = 0; i < pdata->keymap_size; i++) {
                 input_set_capability(input_dev, EV_KEY, pdata->keymap[i]);
                 mpr121->keycodes[i] = pdata->keymap[i];
}
//input_set_events_per_packet - mark device as capable of a certain event
//dev: device that is capable of emitting or accepting event
//type:type of the event (EV_KEY, EV_REL, etc...)
//code:event code
//In addition to setting up corresponding bit in appropriate capability bitmap 
// the function also adjusts dev->evbit.

Task 1: Configure MPR121

It's better to put all the configuration in an independent function  mpr121_phys_init(pdata, mpr121, client)

initialize touch/release threshold

for (i = 0; i < keynum_config; i++) {
        addr = ELE0_TOUCH_THRESHOLD_ADDR + ((key_matrix[i] + i) * 2);
        ret = i2c_smbus_write_byte_data(client, addr, TOUCH_THRESHOLD);
        ret = i2c_smbus_write_byte_data(client, addr+1, RELEASE_THRESHOLD);
    }

configure GPIO

 i2c_smbus_write_byte_data(client, GPIO_ENABLE_ADDR, gpio_config_value);
 i2c_smbus_write_byte_data(client, GPIO_DIRECTION_ADDR, gpio_config_value);
 i2c_smbus_write_byte_data(client, GPIO_CONTROL_0_ADDR, gpio_config_value);
 i2c_smbus_write_byte_data(client, GPIO_CONTROL_1_ADDR, gpio_config_value);

tache 2: Installer IRQ et handler

request_threaded_irq(client->irq, NULL,
    mpr_touchkey_interrupt,  //handler
    IRQF_TRIGGER_FALLING,
    client->dev.driver->name, mpr121);

Registrer device avec input core

input_register_device(input_dev);

Mettre à jour MPR121(client)

i2c_set_clientdata(client, mpr121);

Configurer capacité de "wake-up"

device_init_wakeup(&client->dev, pdata->wakeup);

tache 3: Creer sysFs

ret = sysfs_create_group(&client->dev.kobj, &mpr121_attr_group);
Until now, a generic driver for mpr121 is done. With the sysfs, the parameters like threshold and touch mask could be configured dynamically in the console without recompiling the driver. And if the correspondence of the led and the buttons changes, a simple modification in the board file is enough.

Linux Driver I2C

Dans le driver:

Register a driver : i2c_add_driver()

static int __init mpr_touchkey_init(void)
{
    return i2c_add_driver(&mpr_touchkey_driver);
}
static struct i2c_driver mpr_touchkey_driver = {
    .driver = {
        .name  = "mpr121",
        .owner = THIS_MODULE,
        .pm    = &mpr121_touchkey_pm_ops,
    },
    .id_table = mpr121_id,
    .probe  = mpr_touchkey_probe,
    .remove = __devexit_p(mpr_touchkey_remove),
};
static const struct i2c_device_id mpr121_id[] = {
    {"mpr121_touchkey", 0},
    { }
};
MODULE_DEVICE_TABLE(i2c, mpr121_id);

Delete a driver : i2c_del_driver()

static void __exit mpr_touchkey_exit(void)
{
    i2c_del_driver(&mpr_touchkey_driver);
}

Dans le board file

Register the bus I2C : omap_register_i2c_bus()

static int __init tam3517_i2c_init(void)
{
    omap_register_i2c_bus(1, 400, tam3517_i2c1_boardinfo,
            ARRAY_SIZE(tam3517_i2c1_boardinfo));
    omap_register_i2c_bus(2, 400, tam3517_i2c2_boardinfo,
            ARRAY_SIZE(tam3517_i2c2_boardinfo));
    omap_register_i2c_bus(3, 400, tam3517_i2c3_boardinfo,
                    ARRAY_SIZE(tam3517_i2c3_boardinfo));
    return 0;
}

static struct i2c_board_info __initdata tam3517_i2c3_boardinfo[] = {
#if defined(CONFIG_KEYBOARD_MPR121) || defined(CONFIG_KEYBOARD_MPR121_MODULE)
    {
        I2C_BOARD_INFO("mpr121_touchkey", 0x5b),
//le nom doit correspondre lequel dans le i2c_device_id 
        .irq = OMAP_GPIO_IRQ(CONFIG_TAM3517_MPR121_BUTCAPA1_IRQ_GPIO),
        .platform_data = &mpr121_pdata,
    },
#endif

static struct mpr121_platform_data mpr121_pdata = {
    .keymap_size = ARRAY_SIZE(mpr121_touchkey_matrix),
    .keymap = mpr121_touchkey_matrix,
    .wakeup = 1,
    .vdd_uv = CONFIG_TAM3517_MPR121_TENSION,
};

static u16 mpr121_touchkey_matrix[3] = {
    KEY_0,KEY_1,KEY_2,
};